Wednesday, 7 December 2022

Putting a lid on it - Updated

Since installing the helix, I have been pondering the best way to deal with the space it takes up, a square just over 1200mm. My basic options were to leave the area open forming a large unsceniced space in the middle of the layout or provide some form of scenic treatment which incorporates it into the layout as a whole.

Leaving it unsceniced would work from an operational perspective but would create significant visual distraction. The only advantage that the option offers is easy access to the top of the helix for maintenance but this can be achieved using other means. The option was discarded.

It was then a question of how best to scenic the helix. My though process was assisted by the owner of the Burrawon Branch Model Railway who regularly posts You Tube videos on various aspects of his layout. Recently, he published a segment on the scenic treatment of his helix. Burrawon Branch Model Railway The value of this video was that some of his stated objectives were similar to what I am seeking to do, specifically to disguise the top of the helix and to create a visual separation between the branch line crossing the top of the helix and the mainline using it.

My solution is not quite the same as the Burrawon Branch, rather I have decided to build scenery across the top of the helix with the Kingston Plains branch line crossing this area while the main line disappears into a tunnel.

While the top of the helix is landscaped, the sides of the helix will remain open for maintenance purposes. If I find this too distracting, I may fit a curtain around it but right now, I suspect that won't be necessary. 

The 'lid' has been built using my usual technique of mass styrofoam, carved to shape and then covered with very cheap absorbent towels from Woolworths soaked in a 50/50 mix of water and PVA glue. This serves two purposes. It contains any loose balls of styrofoam which sometimes break free and provides a suitable surface for the next step, covering with a various blends of coloured tile grout again mixed with a 50/50 water and PVA glue.

 I have incorporated a few landscaping elements which could not be included on the refurbished Philip's Creek station modules.The most significant of these is the Philip's Creek water storage tanks and treatment plant. I am also incorporating a small cameo scene on the upper helix loop to provide a little bit of interest on the outside of the layout. This sandstone cliff probably has more in common with Cowan bank on the Short North rather than the line between Singleton and Muswellbrook. The threaded rod will probably become a burnt out stump.  

It's still a work in progress!


Just a quick update to show the work of the last few weeks as the 'blue hills' have gradually been covered with tile grout mixed in a 50/50 PVA water solution. Much more detail work to do but this has broken the back of the 'bulk earthworks'.


"So this is Christmas"

It's come around again and this will probably be my final post for 2022 as the year rapidly draws to a close,  I'd like to take the opportunity to wish all readers  a Merry Christmas and a very happy 2023 for you and your family.


Tuesday, 27 September 2022

Hunter River Bridge - final positioning


Well, it's only taken three years but the Hunter River Bridge has now been incorporated into the layout albeit with 'bumper rails' just in case something failed.

It was an easy process to remove temporary structure which has bridged the gap for the past 12 months but I had erred slightly with horizontal alignment, failing to allow for the offset of the track on the bridge. Rectifying that mistake was easy, relocating the bridge about 10mm laterally. The 3mm ply strip which serves as the bridge foundation was screwed to the base board frame.

Once the bridge was in place, I glued the track on top of the trusses with PVA glue using timber off-cuts to hold it in place as the glue cured. I still have to fit  check rails but this will happen when the scenery is completed.

Since the photos were taken, the base board frame has been covered by 3mm ply which, in due course, will become the Hunter River. Gaps have been filled with tape and jointing compound and the 'bumper rails' have gone.


The bridge will be the major scenic feature on the lower level of the layout but as I mentioned in my previous post, scenery will wait until other areas have completed. I'll then face the challenge of creating a wide expanse of water, something I haven't tried before.  So there's still a lot of work to do before I can recreate to the image that started it all ('Northern Exposures' (p 128, photographer Greg Triplett))


Sunday, 21 August 2022

Hunter River Bridge - a bit more work

Just a quick update post on my long running Hunter River rail bridge. In my most recent post on this project at the end of March, I said that I was wrestling with the challenge of how to get a sandstone block finish on the piers and abutments. Eventually, I located a paper product called Art Printers Dressed Stone Building Papers from Modeller's Warehouse. 

The finish looks great but is very delicate. Don't use masking tape to hold it in position. The building papers are supposedly a self adhesive product and it does stick to itself but it is less successful adhering to the foam that was used to construct the abutments and piers. It was a fiddly job particularly working around the curved surfaces and it was necessary to use PVA glue in some instances when the self adhesive failed. White exposed edges were painted with acrylics.

I then used weathering powders in an attempt to represent the aged stone of the prototype. Although it looks OK, it is a much redder than I had hoped. But it is what it is. 

I fitted the three 'steel' trusses with the assistance of a three foot spirit level and then fixed a piece of timber underneath to stiffen the structure until the bridge is installed. (thanks for the suggestion Rob). Once the backdrop has been installed, the bridge will be dropped into position and the track re-laid. Scenery will happen in due course but other areas will take priority.


Thursday, 14 July 2022

The Inconsistent Pedant - a 38 class at Philip's Creek

My wife recently showed me this cartoon from the Medieval Mirth and Jollity Facebook page as I am, within the family, well known for my pedantry when it comes to inaccuracies in historically themed movies and TV shows. 

My pedantry also impacts Philip's Creek. In a post about eight years ago, I recounted a project where I converted a KB parcel van to MHO guards van, the reverse of what happened in reality ( Back conversion of a KB mail van ). The primary motivation was my understanding that the KB parcel vans were not built until around 1973-74 and as such were on the cusp of my modelling time period, 1967-1973. Similarly, I have avoided purchasing models which were unlikely to have run on the Main North between Singleton and Muswellbrook in that period. At least, that was the policy until the release of the ARM 38 class. I appreciate that this is a budget priced model and there are a few shortcomings but the temptation to own a model of the premier class of NSWGR steam locomotives was too great and I bought one. 

I purchased the first model to be released, 3806, resplendent in its original green livery. Had I waited a bit, other models appropriate to my time frame became available. But I didn't know that at the time, so a green livery it was. The problem with this decision was that, by my modelling period, all of the 38 Class but three (3801, 3813 and 3830) were attired with a black livery. I didn't want to undertake a full repaint so I had to focus on 38s which carried a green livery in the late 1960s. I understand that 3813 carried its original livery throughout its life while 3801 and 3830 were repainted in a green livery in the 1960s. Unstreamlined 3806 was never going to become streamlined 3801, so it was down to a choice of two. I had also heard rumours that the 3830 repaint was a slightly different shade of green to that used when the class was introduced, so it came down to a choice of one, 3813.

As a minimum, this meant removal of the factory applied decals and the application of new numbers. As usual these days, a You Tube search turned up a multitude of potential procedures. Of these, I decided to try the method described in this clip ( How to renumber a Model Locomotive - Made Easy ) because it seemed to be less abrasive than others. It worked well, particularly for the main numbers on the side and tender although the buffer bar proved a bit more challenging. Replacement decals came from Stephen Johnson Models. 

With a bit of weathering and some extra non plastic coal, 3813 was ready to enter service, but there was one further problem. I understand that the 38 class didn't normally operate north of Newcastle because of the potential for track damage. The reality is that I knew this already and it was the primary reason why I had not purchased a 38 class earlier. But therein lies my inconsistency; when tempted with a reasonably priced model, I succumbed to that temptation even though the locomotive did not operate in the area I was modelling.

However, a 'get out of jail' card arrived from an unexpected quarter. A few weeks ago, I was reviewing the photos I acquired from the ARHS (NSW) when I was researching the Hunter River Bridge at Singleton. I found two photos showing two different 38 Class locomotives crossing the bridge. (ARHSnsw RRC 041186.jpg and ARHSnsw RRC 041186.jpg). I presume these were probably ARHS tours but, at least, they indicate that 38s did  occasionally travel further north of the Hunter and probably at least up to Muswellbrook.

So, the Philip's Creek operating schedule has now been adjusted to include an occasional tour train hauled, of course, by 3813 and, of course, the pedant lives on.


Sunday, 10 July 2022

There are gears and there are gears! Updated

The splitting of the muff gears on the Trainorama 44 class is a well known fault and my locomotive 4473 was no different. A few years ago, at a model railway exhibition, I purchased a pack on replacement gears which were put away until I could find time to get around to it. 

A few months ago, I joined the NMRA and at a recent meeting, there was a short demonstration on how to replace the cracked gears on a 44 class. The first part of the demonstration focused on the technique to remove the cover plate on the bogies and second part showed how to replace the gears. The replacement gears were the same type as those which I had purchased earlier.

Armed with this knowledge, I decided that it was high time, I tackled this job. The removal of the bogie cover plate was achieved without difficulty as was the change over of each gear. The problems began when I started to reinstall the gears. The axles did not drop easily into place and required a lot of fiddling to settle in the bogie frame. When tested, the reassembled front bogie ran roughly and the rear bogie seized completely.

After several more unsuccessful attempts, it seemed that the gears were not meshing properly, certainly not as well as the set used in the demonstration. As a final throw of the dice, I purchased another pack of gears. These fitted dropped into the bogies without difficulty and 4473 was mobile again.

It seems there are gears and gears. Comparing the two packs, the teeth on the older pack seemed a bit smaller and the spacing may have been slightly different. I don't know if the older pack was faulty or if there had been some refinement in the design.

However, although 4473 is again mobile, the issue is still not fully resolved.  I have noticed that the axles on the front bogie are moving laterally, enough to displace the bushes which provide the electrical connection between the wheels and the frame. I'll check the gauging again but I suspect that the gears might be slightly shorter allowing the bushes to move more than they should. If all else fails it's off to Trainorama to purchase three new axles.

Update: I did check the gauging again and it seems I may have erred slightly in my earlier work. To date, the bushes appear to remain in position but I'll need to keep an eye on it.

 Further Update: It has still not run properly, so I gave up and purchased a complete set of wheels. That seems to have fixed it and 4473 has returned to service minus the original clicking sound.


Sunday, 29 May 2022

Look Mummy, Garratt!


This post is a little off topic but, dear reader, I ask that you indulge me in this instance.

My mother passed away about two months ago. It was not unexpected and, at 95, she had had a good innings although her last 10 years were blighted by the scourge of Alzheimer's Disease.  While there are many memories beyond the scope of this blog, I wanted to take a few moments to discuss her contribution to my model railway hobby in general and Philip's Creek in particular.

Many long time participants in the hobby probably acknowledge the contribution that their fathers made in getting them started in the hobby and teaching them some on the necessary 'trade' skills along the way. Certainly, my father helped me in that way, setting up my first layout on a board, wiring it up, building a controller and installing isolating switches. I probably inherited some of his problem solving abilities  and he taught me a few skills along the way although maybe I wasn't paying too much attention when he was showing me how to solder.

Less frequently, we acknowledge our mother's contribution to our hobby. Mum was always supportive of my interest in model railways although wasn't that impressed when I moved from HO to N scale. Perhaps, they were just too small. She was certainly very positive when I returned to HO scale in the mid 1990s with the construction of Philip's Creek. She had something of an eye for realism and, in my childhood, she pushed me to incorporate terrain features onto an otherwise flat featureless baseboard.  More recently, as Philip's Creek was being built, I would periodically show her its progress when she visited. Invariably, Mum's first question would be 'when are you going to install fences and power poles?' Intuitively, I think she appreciated that those mundane items added an extra level of realism to the layout, something I've come to refer to as 'modelling the ordinary'.

However, there was one other way that Mum made a lasting impact on Philip's Creek but I need to give some background as context. My parents built their first home in the mid 1950s in what was then almost semi rural Normanhurst near Hornsby north of Sydney and it was in this house that I spent my formative years. The home was relatively close to the railway line, the Short North. In those days, electrification ceased at Hornsby and so there was plenty of steam heading north and south including the relatively new, distinctive AD 60 class Garratts. In later years, my mother would tell anybody who listened that the first word I spoke was not 'mummy' or 'daddy' but 'Garratt'. She did have a tendency to exaggerate but a fairly regular activity in that period was for yours truly to be stood on the letterbox where it was possible to look down the street at trains passing through Nornmanhurst Station. If a 60 class was in charge, there was inevitably an exclamation, 'Look Mummy, Garratt!'

Fast forward to the mid 1990s when I said I was going back to HO scale, Mum announced that she wanted to purchase a locomotive for the new layout, and there was only one choice, a Garratt! I was working in the US at the time, so as often happened, Dad was left to make it happen. After a few false starts with the second hand market, Dad purchased a DJH model and had it professionally assembled. My son, who was at a boarding school in Sydney, was enlisted as the courier when he returned to Missouri during the school holidays. And so 6018 joined the roster and has continued to serve since 1997.

Time has moved on, but this story inspired me to create this micro scene as a memorial to Mum and her contribution to Philip's Creek.

 Vale Mum. Thanks for everything - not just the Garratt!


Tuesday, 29 March 2022

Hunter River Bridge - Piers and abutments.

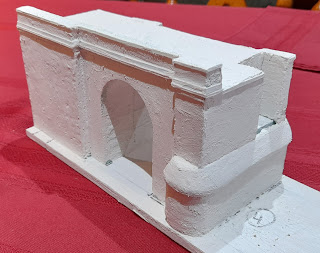
It seems that several modellers are completing long delayed models. Maybe not completing but my Hunter River bridge model has also seen a bit of recent progress. I had first mentioned its construction in October 2019 but progress has taken a back seat to other tasks associated with moving and reassembling the layout. That post focused upon the construction of the trusses whereas this post concentrates on the construction of the two intermediate piers and two abutments. As I had noted previously, my modeller's licence requires the bridge to be shortened from five spans to three.

Originally, I had contemplated a potential a 3D printed solution but I struggled to develop suitable graphical images. So instead, I reverted to a first principles physical model using shapes cut from a sheet of  XPS Handy Panel foam board. As I mentioned, this product is easily sawn and shaped with little mess. With care, it can even be screwed.

The piers were fitted to a sheet of thin sheet of plywood. When complete, the bridge will replace a temporary section on the layout.

The photos opposite and below show stages of the construction process. A piece of timber, visible in the second photo, was inserted into each column to assist securing it to the ply and provide additional support to each of the trusses. Most of the cutting was completed on a band saw and glued together with PVA glue.

I applied several coats of Uni-Pro Smooth Coat to cover the foam board. This is intended to seal the foam and create a surface in preparation for whichever finish is applied.


I have wrestled with a method to finish the piers and abutments. Ray Love's photo opposite (Ray Love 'Days of Steam', p67) appears to shows the piers and abutment constructed out of sandstone blocks. At this stage, I anticipate applying a suitable printed paper product unless other solution emerges. 


The photo below, a reprise from my January post, shows the bridge sitting on the track above its final location. Once the support structure has been finished, I'll fit the trusses and track before lowering it into position.  But now, it's still a work in progress but as I said earlier, nothing happens quickly at Philip's Creek!


Friday, 28 January 2022

Services can now resume

A few days ago, I completed the trackwork and associated wiring for the remodelled Philip's Creek station. This means that the railway has now returned to approximately the same operational condition that it was in August 2020 before the downsizing move. Yes, there is a lot of scenery to complete but the core element of the layout, track laid, wired and operational, has been finished. Whilst there are a few more sidings to complete, trains can once again travel between the two staging areas representing Singleton and Muswellbrook.

This milestone was reached more with a sense of relief rather than achievement. By this, I mean relief that Philip's Creek has survived the downsizing albeit in a new configuration, relief that the layout fitted into the new space as planned and finally, relief that I still had enough energy and enthusiasm to make this happen in a reasonable time after moving.

The two photos below show both ends of the Philip's Creek station area. Philip's Creek itself can be seen on the right of the left hand photo. Incidentally, the astute observer will realise that the header photo for the blog can never be redone as that side of the module now abuts a brick wall.

Once again, 4856 got the honour of making the first run between the two staging areas hauling a rake of RU wagons from Muswellbrook to Singleton.

The obvious next question is 'OK, now what?"

Now that the layout has been reconnected, I'll operate the it for a while to ensure that the new track and electrics work as well as testing the hauling capacity of some locomotives on the helix. Once I'm happy with the operation, I'll start work on the scenery. However, in the interim, I'll start work on repairs on the other modules which sustained minor damage during the move and the reconstruction. 

And maybe finally make some progress on the long stalled Hunter River bridge!