Friday, 4 April 2014

Culverts

There is nothing more ordinary than a culvert! They have to be the most ubiquitous means of water or gap crossing for both the road and rail but most of the time, they are completely unnoticed by people who cross them.

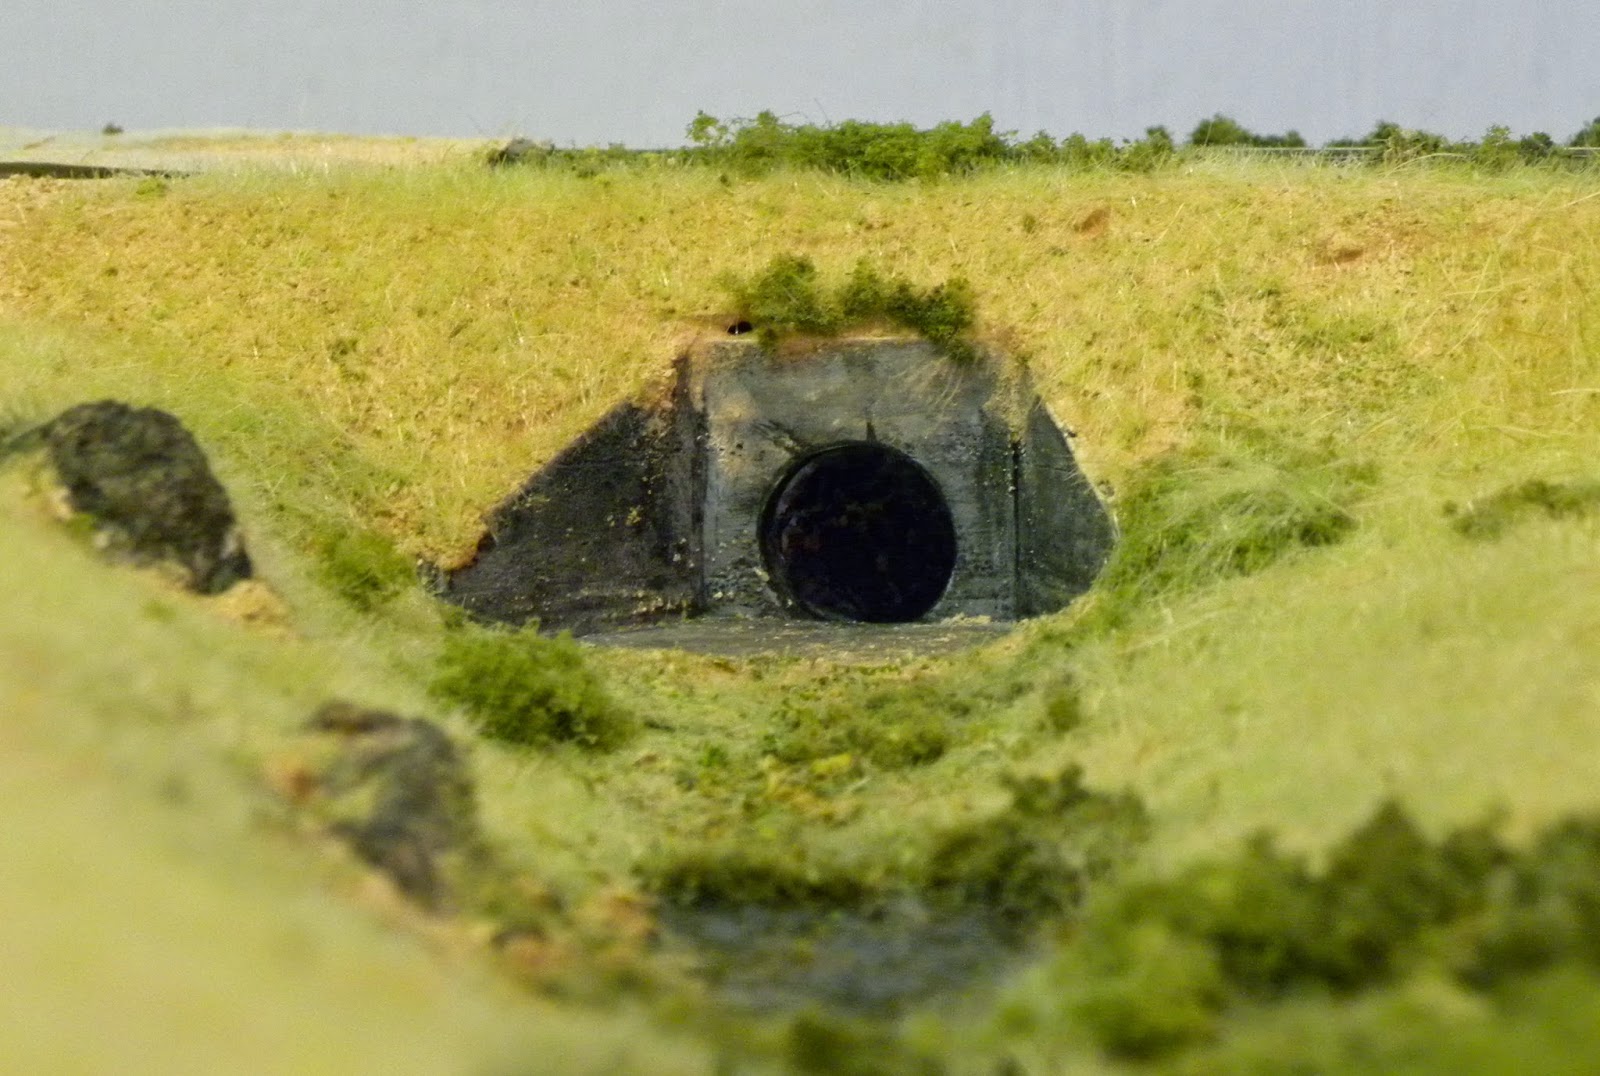
Over the last few weeks, I have been installing two culverts as part of the undulating terrain on the new module. While the siting of these structures is fairly obvious, there is one real life design feature that should be reflected in any model of a culvert. I am speaking about the need for sufficient cover of  earth over the top of the pipe. The compacted material above the culvert spreads the loads on the pipe and prevents crushing. In my earlier working life, the normal rule was that the minimum cover should be the greater of 600mm or half of the pipe diameter. While this metric related to metal or Armco culverts under roads, the concepts are similar. Speaking to a mate still working in the track maintenance industry, he suggests that with the current train loads, the minimum cover requirement may be greater. However, I suggest that for the purposes of railway modelling, the cover over culvert must look substantial.

The first culvert to be installed (a single barrel) was an old Woodland Scenics plaster kit. I had originally intended to install it on Philip's Creek. However, I subsequently found an older style headwall reminiscent of the type used on the Northern Line near Normanhurst where I grew up. So the Woodland Scenics  kit stayed unused till now.

For the second culvert, I wanted to model a broader less well defined creek, and so decided to use a multi barrel arrangement. This had to be scratch built.

I was able locate a drinking straw that measured about 450mm or 18" in HO scale so this became the diameter of my multi barrel culvert. Personally, in 1:1 scale, I would not use a culvert diameter below 600mm as there is too great a potential for blockage. However, in 1:87, this provides an opportunity for a cameo scene with a maintenance team working to clear the culvert.


The headwalls were constructed from styrene sheet using typical dimensions found on page 42 of the Rocla Product Guide (http://www.rocla.com.au/ProductGuide/)

A 5mm length of the drinking straw was inserted in each opening. After a grey primer coat, the headwalls were given several washes using soft pastels and  Isocol Rubbing Alcohol. The inside of each opening was painted black as was the Styrofoam behind the culvert headwall.

The photo opposite shows the headwall installed but with grasses and foliage yet to be added.

As I said at the start, these are very ordinary and simple structures, but the humble culvert is something that adds to the overall scenic impression that I am seeking to represent.

As a footnote, I have recently become aware of a range of brick culvert headwalls manufactured by Keiran Ryan (http://www.shapeways.com/model/938743/3-foot-brick-culvert-ho-scale-3.html?li=shop-results&materialId=61). These look particularly impressive, representing earlier designs that were used when many of the railway lines were first constructed. The type of headwalls I have shown in this post are reinforced concrete using designs that probably originate in the 1960s. The reinforced concrete solution would have been used to replace the earlier types of headwalls if they failed. That said, I understand that many of the earlier designs are still in place to this day.


Thursday, 20 March 2014

Terraforming aka "making a mess"

Just before Christmas, I posted a short summary of the first significant expansion of Philip's Creek for about eight years (http://philipscreek.blogspot.com.au/2013/12/moving-forward-at-last.html). Since then, the track has been laid and, over the past few weeks, I have started to work on the terrain adjacent to the line.

As it has been quite a while since I last did some serious landscaping, it was time to relearn some old techniques and try a few new ones. However, one thing that remains constant is the use of Styrofoam both as a base for the track and a landscaping medium. I have used it successfully for every module of Philip's Creek. It has proved to be stable, lightweight, and, when managed properly, has stood the test of numerous moves without any damage. In my experience to date, there are only two things to be wary of when using Styrofoam, any exposure to petrochemical products which can see your creation disappear before one's eyes, and the mess as the final landform is created. Of these, the first can easily be avoided or managed, the second cannot.

My general approach to building the landforms is fairly conventional, build up layers of Styrofoam, carve them to a final level, apply some form of coating to the Styrofoam and then add various scatter material to finish. The adjacent photo provides an overview of the progress to date.

I mentioned the impossibility to avoid making a mess as the Styrofoam is shaped. My objective has been to contain this mess to the immediate area of the construction and avoid, like the plague, any activity that sees the Styrofoam pellets migrating into the house and the consequent wrath of  'higher authorities'. At one stage, I had two battery power vacuum cleaners working in tandem, with a normal vacuum cleaner as backup.

In shaping the Styrofoam, I have preferred to shave it with a large knife rather than hot wire. I then used the hand rasp shown the photo to achieve the final shape. While it gives a great outcome, it is the tool that creates the greatest mess and requires regular cleaning.

Previously once the shape had been finalised, I either coated it with a coat of plaster or paper towels impregnated with plaster. However, over time, I found instances of flaking or lamination. This time, I decided to try absorbent wipes sprayed with a 50/50 mix of PVA and water and allowed to cure. They are very inexpensive, a pack of 10 cost about $1 from Woolworths. To date, the results have been very positive and the wipes, after the glue has dried, provide a firm hard shell.


I use a mix of earth coloured tile grouts to provide the basic ground cover. This was sprinkled onto good coating of the PVA/water mix and allowed to set. A second coating of the PVA/water was applied just to make sure everything was glued down. One of the unexpected benefits of this was that it highlighted low points in the creek line. The still drying glue can be seen as the white shape at the rear of the adjacent photo. These will become stagnant ponds in an otherwise dry creek line. The preliminary painting for these started, and since the photo was taken, a couple of layers of clear vanish have been added. This was time to be cautious about the interplay between Styrofoam and mineral based paints. Fortunately, no adverse effects have been noted and I suspect that the earlier work has provided an effective seal.

 However, there is still a lot more landscaping to do and the other new technique for me is the use of static grass. I have recently invested in an applicator together with a few different coloured grasses. There appears to be a lot of instructional material available on You Tube and other places but there is no replacement for personal experience, so a few more lessons to learn.


Wednesday, 26 February 2014

The AndIan Turret Tender - Now in Service

My AndIan Turret Tender has now entered service behind a freshly painted and renumbered 50 class.


My earlier post on the tender (http://philipscreek.blogspot.com.au/2014/01/the-andian-5000-gallon-turret-tender.html) showed the model when most of the basic construction had been completed. A more detailed construction sequence is being posted by Peter Hearsum at http://burrowa.wordpress.com/ as he undertakes a similar project.

Thanks also to AndIan Models for providing some spare ladder sides that allowed me to have a second attempt at the ladder.


Painting was fairly straight forward. Because the locomotive was a metal DJH kit, I was able to strip the existing paint using an acetone based nail polish remover. For plastic kits, I have found the non acetone products work well with less risk of damage to the plastic. It took a few attempts but most of the the surface was back to bare metal. The locomotive and tender were both sprayed with a Floquil weathered black and then a light coat of  Humbrol rust wash. Most of the weathering was completed with an airbrush but some rust powder was used in a few additional places.


All of the tender wheels were fitted with phosphor bronze wipers and a permanent electrical connection has been made to the locomotive. I had intended to fit additional pickups to the locomotive but the chassis configuration seemed to make this difficult with the materials I had to hand. A project for another day!

As an aside, I found it necessary to fit a long shank coupler to prevent buffer lock on some of my tighter curves.


Now, what to do with the old tender? In the short term, I'll probably de-coal it and leave it on a siding. However, if in the long term, I manage to purchase a C30T, it may again be pressed into service.


Thursday, 13 February 2014

"Modelling the ordinary"


Brad H, in a recent post to his blog (http://armchairmodellerdownunder.blogspot.com.au/2013/12/opinion.html), discussed some criticisms levelled at a layout featured in the December 2013 issue of Model Railroader. One of concepts that attracted adverse comment was the idea of ‘modelling the ordinary’. Brad’s discussion went on to address other issues, but I realised that the phase ‘modelling the ordinary’ put some context to what I am seeking to achieve with Philip’s Creek.

As an aside, the contribution of those individuals who photographed what was ‘ordinary’ at the time and have made these available over the years must be acknowledged. Without their efforts, modellers such as myself would have little to work with other than the fragmentary memories of childhood.
For some, the term 'modelling the ordinary' may seem a disparaging way to describe their pride and joy. However, as I pondered the concept, I realised that I have been doing it for years by implicitly applying a simple test to determine the ‘ordinary’; what scenic features are included and what should be excluded. I endeavour to ensure that landscape features, buildings, the flora and fauna are not so unique as to attract the attention of an average observer in the late 1960s. For me, this means no grand buildings, no major or unique engineering features or infrastructure, and geographic features that are non-specific and generic to the Upper Hunter.
Having said all of this, there are at least two instances where Philip’s Creek falls short of the criteria that I have just outlined.
The first is the narrow gauge logging tramway. I cannot find any examples of a logging tramway in around the Upper Hunter although I’d be very happy to be corrected on this. I am also not aware of any logging railway or tramway in NSW that was still an operating entity by the 1960s. I admit that its inclusion was an indulgence and a way of combining two railway interests. While the locomotive (a Roundhouse Shay seen on the right of the adjacent photo) remains operational, the tramway will remain as it is. However, if it does ‘give up the ghost’, then tramway will be converted into what was more likely by the late 1960s, a derelict relic of a bygone time.
The second is the gully and viaduct that do not seem in keeping with the typical undulating terrain in the Upper Hunter. Originally, it was installed as device to hide the entrance to a staging area,  but the river gully seems too precipitous and I am not aware of many brick viaducts being used as a means of crossing such an obstacle. Again, I'd be happy to be corrected on this. With the installation of the new scenic module, the original reason for this terrain feature has ceased and so it will be replaced. The major river will filled and become a small creek with a culvert passing under the track formation.
Well, that's the intent. Now all that is needed is the courage to start the demolition!

Thursday, 23 January 2014

The AndIan 5000 Gallon Turret Tender - A Work in Progress

Santa Claus very kindly left one the new AndIan 5000 Gallon Turret Tender kits for me under the Christmas tree this year. Well actually, the wife grabbed it when it arrived in early December and it didn't reappear until Christmas Day.

This is a very detailed  but, at the same time, a very delicate kit. It requires a level of soldering skill that probably exceeds mine to construct the model exactly as per the instructions. However, to date and, fingers crossed, I have only made a few small errors that compromised the etching detail. Once painted, hopefully, these will only be apparent if someone starts to count rivets on the chassis. However, I confess to resorting to superglue to fix some of the smaller less critical detail items.

It is a work in progress and there is still a long way to go but the major elements of the tender have been completed. The instructions have been helpful and I generally followed the sequence. However, I have left some external items to be installed when everything else is completed. A CD with prototype and construction sequence photos is included in the kit and these have been very useful during the construction.

There have been a few challenges during the construction to date. Despite the warnings in the instruction, I stuffed up the construction of the ladder. I was able to fabricate a replacement using the kit's side runners and a Uneek ladder. I also struggled with the fitting of some bronze castings.

The kit allows for the fitting of a speaker and sound decoder. I don't intend to utilise this capability but will fit pickups to all of the tender wheels and upgrade the pickups on the 50 class.

I also plan to strip back the 50 class and repaint it in conjunction with the tender. The locomotive will be renumbered as one that operated in the upper Hunter in the last years of steam. (note this paragraph has been edited to remove the inaccuracy highlighted in Phil Collin's comment below.


Monday, 13 January 2014

Woodland Scenics Track and Wheel Cleaning Tools Update

About a year ago, I wrote a post detailing my initial impressions on the Woodland Scenics tools that I had purchased around December 2012. (http://philipscreek.blogspot.com.au/2013/01/track-and-wheel-cleaning.html).

This piece provides a short update 12 months down the track so to speak.
 

The track cleaner has been used extensively and is an effective tool for track maintenance. The rubberised pads (the only ones that I used) have worn, but that is to be expected and they are not to the point of needing replacement.

My earlier post was more circumspect about the wheel cleaning tool and it languished, almost unused, over the past 12 months. On the few occasions when I did try to operate it, the tool usually failed to activate the locomotive long enough to complete any significant wheel cleaning action. However, a recent comment on the original post by Bill Roach
provided a suggestion that prompted me to have another try.

Bill had sprayed the white cleaning treads on the tool with CRC 2-26. Having finally been able to locate a can of this fabled product, I was able to do the same. In addition, I also sought to address the tightness and lack of movement in the centre plate (the black middle section with the two brass contact strips running longitudinally) that had previously inhibited the cleaning process. To achieve this, I pushed the white cleaning treads outward slightly until the centre plate moved freely. Previously, I had suspected that this would reduce the contact between the wheel and the cleaning tread but this does not appear to be the case. 

The results are shown on the two photo below.


And a bit closer...


I don't know if it was the CRC 2-26 or the adjustment to the cleaning treads or a combination of the two but the wheel cleaner certainly operated more effectively, and at least now, I don't feel the purchase 12 months ago was wasted.

PS. The darker area on the first photo is due to the mug photographer forgetting where the light was.


Sunday, 22 December 2013

Tanker Wagons at Christmas

In my last post for 2012, I anticipated the arrival of two long standing orders in 2013, the Trainorama 48 class and the SDS tanker wagons to add to the rolling stock that passes through Philip's Creek. Well at least one was achieved with the arrival of the SDS tanker wagons a few days ago.

I had ordered the 1960s version and, straight out of the box, they look great. However, it was time to consider weathering. Photos that I have consulted seem to indicate a wide range of weathering options but most seem to show an underlying rust hue. I sought to represent this with a light coat of Humbrol Rust Wash. This was followed with a black soot colour sprayed downwards concentrating on the upper part of each wagon. I may have overdone this a bit. Each wagon was then sprayed with a matt finish.

To finish, I added some additional rust on the chassis and substructure using pastels together with a dilute greasy black wash on and around each dome. Even though it has a gloss finish, much of the grease sheen has been lost in the overall black of the upper part of each tank. The effect doesn't come through on any of the photos I took and is only just visible when looking carefully. While I could add some extra wash around the domes, I think I will leave it for a while until I can get trains rolling again to see how they appear as part of a larger consist.

As 2013 draws to a close, I would like to thank those who have offered comments and advice throughout the year, and to take this opportunity  wish all those who read this post, as well as your "near and dear ones", a very Merry Christmas and a Happy New Year for 2014.

cheers Phil